The joys of writing a WAV file
I recently had an interesting challenge. I needed to write out a WAV file from GNURadio. Any output in GNURadio goes through something called a "sink". There is a built in WAV file sink, but it writes out a single WAV file. What I needed was to write out a series of WAV files each with the same time period. The purpose of this was to allow me to create WAV files containing entire FT8 transmissions which I could later decode. The WAV file format is uncompressed so it can be written out quickly without much CPU being utilized.
So I needed to write my own sink for this to happen. I assumed I would be able to use a library to handle the WAV file format stuff, but it did not turn out that way. Python has a built in wave library, but it doesn't do everything I wanted. So this describes what I had to learn along the way. GNURadio is written primarily in C++, but you can also extend it using Python. So I opted to write my code in Python. My use case is straightforward. Since I am using this to store audio from a radio receiver, I only need to write a single audio channel at a constant sample rate.
What is the WAV file format anyways?
As it turns out, there is no such thing as the WAV file format. Instead, the WAV format is actually contained within a RIFF file. The way this works is you write out a RIFF file that indicates it contains a WAVE file. RIFF is always written in little-endian byte order. RIFF consists of the following
- chunk descriptor
- fmt sub-chunk
- data sub-chunk
All of these sections are mandatory. This table describes the start all of those sections
| Reference | Section | Byte offset | Length | Type | Description |
|---|---|---|---|---|---|
| A | chunk descriptor | 0 | 4 | ASCII string | Chunk ID |
| B | chunk descriptor | 4 | 4 | uint32 | Chunk Size |
| C | chunk descriptor | 8 | 4 | ASCII string | Chunk Format |
| D | fmt | 12 | 4 | ASCII string | sub chunk ID |
| E | fmt | 16 | 4 | uint32 | sub chunk size |
| F | fmt | 20 | 2 | uint16 | audio format |
| G | fmt | 22 | 2 | uint16 | number of channels |
| H | fmt | 24 | 4 | uint32 | sample rate |
| J | fmt | 28 | 4 | uint32 | byte rate |
| K | fmt | 32 | 2 | uint16 | block alignment |
| M | fmt | 34 | 2 | uint16 | bits per sample |
| P | data | 36 | 4 | ASCII string | sub chunk ID |
| Q | data | 40 | 4 | uint32 | sub chunk size |
After the final item comes the actual data samples.
Item A - Chunk ID
This is always the ASCII string "RIFF" without a terminator.
Item B - Chunk size
This is a 32 bit unsigned integer that is the size of the file, minus the first 8 bytes.
Item C - Chunk format
This is always the ASCII string "WAVE" without a terminator.
Item D - Sub chunk ID
This is always the ASCII string "fmt " without a terminator. Notice the trailing space.
Item E - Sub chunk size
This is size of the chunk, minus the first 8 bytes. As a result it is always the value 16.
Item F - Audio format
This describes the audio format. This is always the value 1 which indicates "linear quantization". Samples in this format are stored completely uncompressed
Item G - Number of channels
This value indicates the number of audio channels in the file. Since I only have a single audio channel, this value is always 1
Item H - Sample rate
This value indicates the sample rate. The sample rate is the number of audio samples in exactly one second. For a regular audio file the sample rate is rarely higher that 44100 Hz, which is the sample rate used by compact discs. For my application I used a sample of 8000 Hz.
Item J - Byte Rate
This is the number of bytes required to store one second of audio. This is computed as
\((S * N * B)/8\)
Where
- \(S\) - sample rate, item H
- \(N\) - number of channels, item G. This is always 1 for my application
- \(B\) - bits per sample, item M. This is always 16
Since \(N\) and \(B\) are known in advance for my application, this can actually be computed as
\((S * 16)/8 = S*2\)
So this value is just twice the sample rate.
Item K - Block alignment
This is the number of bytes for one sample. This is computed as
\((N * B)/8\)
Using the same values from calculating Item J. Since N & B are both constants in my application, this is computed as
\(16/8 = 2\)
So it is always the value 2 in my application.
Item M - Bits per sample
This item is the number of bits in a single sample. If you ever hear someone referring to 8-bit audio or 16-bit audio this is what they mean. The number of bits of precision in a single audio sample. It's possible to write 8-bit WAV files and use half the space, but I have no reason to do this. So for my application I always use 16
Item P - Sub Chunk ID
This is always the ASCII string "data" without a terminator.
Item Q - Sub chunk Size
This is the length of the data, computed as
\((T * N * B )/8\)
Where
- \(T\) - the total number of audio samples
- \(N\) - number of channels, item G. This is always 1 for my application
- \(B\) - bits per sample, item M. This is always 16
Since \(N\) & \(B\) are always constant we can compute this as
\((T * 1 * 16)/8 = T * 2\)
So this value is just twice the number of samples.
Streaming out a WAV file
Once I understand the header of a WAV file, I realized that this file format is designed to be written out assuming you already have all the audio samples. I need to actually record audio samples as they come in, then close the file once I have recorded the desired number of samples. If you look at items B, E, & Q they all require knowledge of the remainder of the file to compute. Since I don't know this, I have to write out placeholder values then come back and write the correct values when closing the file.
Writing samples
Actually writing out data samples is straightforward. Since I am writing out 16-bit data samples, each sample is a 16 bit signed integer in the range [-32768, 32767]. In GNURadio, audio samples are always delivered as a numpy array. Each value in the array is a floating point number in the range [-1.0,1.0]. So I need to convert this to an integer before writing it out. This example program shows how I did that
import numpy
data = numpy.array([-1.0, 1.0, 0.5, -0.5, -0.1, 0.1], dtype=float) # Pretend this is audio sample data

output = numpy.array([0], dtype=numpy.short)
output.resize(len(data))

numpy.multiply(data, 32767, out=output, casting='unsafe')

print(output)
This produces the following output
[-32767 32767 16383 -16383 -3276 3276]
So each of the values that are originally in the range [-1.0, 1.0] has been rescaled to the correct range for writing out into the WAV file. Once you have a series of numbers that are in the correct range you can use the python struct module to pack each value into a byte array. This is fine if you're just writing out numbers from a regular python list. But if you're using numpy there is a method on a numpy array called .tofile that just dumps the entire contents to a file. So in my example I could write out my output by calling output.tofile(fout, sep='') where fout is a regular file opened with the python built in open() function.
Closing the file
To close the file, there a couple things we need to do. Technically speaking, the file needs to be padded to have a length that is a multiple of 2. Since all samples written out are 16-bit, this is already the case. So no padding needs to be added. The remaining steps are
The next step is to populate the chunk size. First seek back to an offset of 4 bytes, then write out the length of the file minus 8 bytes.
The second step is to populate the data sub chunk size. Seek back to an offset of 40 bytes, then write out twice the number of samples.
That's it, no additional steps are required.
Example code
To recap everything what we need to do is
- Write out a header, with placeholders for any values we don't know yet
- Scale each audio sample to a range of
[-32768, 32767]and write it out as 16-bit integers - Go back and populate all the placeholders when done writing samples
I'm using Python, specifically Python 3.8 for this. This is what I came up with to write out the file:
import struct

LITTLE_ENDIAN_INT = struct.Struct('<I')
LITTLE_ENDIAN_SIGNED_SHORT = struct.Struct('<h')
CHUNK_SIZE_OFFSET = 4
DATA_SUB_CHUNK_SIZE_SIZE_OFFSET = 40
class WaveWriter(object):
  def __init__(self, fout, sample_rate):
    self.sample_count = 0
    self.sample_rate = sample_rate
    self.fout = fout
    self._write_header()

  def _write_header(self):
    self.fout.write(b'RIFF')
    self.fout.write(b'\xFF\xFF\xFF\xFF') # Place holder for chunk size
    self.fout.write(b'WAVE')
    self.fout.write(b'fmt ')
    self.fout.write(b'\x10\x00\x00\x00') # Sub chunk size, little endian 16
    self.fout.write(b'\x01\x00') # audio format, always little endian 1
    self.fout.write(b'\x01\x00') # number of channels, always 1
    self.fout.write(LITTLE_ENDIAN_INT.pack(self.sample_rate)) # sample rate
    self.fout.write(LITTLE_ENDIAN_INT.pack(self.sample_rate * 2)) # bytes per sample
    self.fout.write(b'\x02\x00') # block alignment
    self.fout.write(b'\x10\x00') # bits per sample
    self.fout.write(b'data')
    self.fout.write(b'\xFF\xFF\xFF\xFF') # place holder for sub chunk size

  def write_samples(self, samples):
    self.sample_count += len(samples)
    for v in samples:
      self.fout.write(LITTLE_ENDIAN_SIGNED_SHORT.pack(v))

  def write_sample(self, sample):
    self.write_samples((sample,))

  def finish(self):
    v = self.fout.tell() - 8
    self.fout.seek(CHUNK_SIZE_OFFSET)
    self.fout.write(LITTLE_ENDIAN_INT.pack(v))

    self.fout.seek(DATA_SUB_CHUNK_SIZE_SIZE_OFFSET)
    v = 2 * self.sample_count
    self.fout.write(LITTLE_ENDIAN_INT.pack(v))
This is significantly simpler than it seems. Almost everything in the header winds up being a constant value.
Now the question comes how to test this code. The easiest way is to write out a file with a pure tone in it. I'll also add in a small amount of random noise, which just soudns like a quiet hiss. This is much simpler than you might think. All you really need to do is compute a value Python's math.sin for every sample. Then it needs to be scaled to the correct range.
sample_rate = 10000
duration_seconds = 6.23
number_of_samples = math.ceil(duration_seconds * sample_rate)
target_freq_hz = 232

rng = random.Random(1)
with open('example_output.wav', 'wb') as fout:
  wav_writer = WaveWriter(fout, sample_rate)
  for i in range(number_of_samples):
    v = math.sin(2 * math.pi * i * target_freq_hz / sample_rate) * 0.9
    v += rng.random() * 0.099
    v *= (2**15 - 1)
    v = int(v)
    wav_writer.write_sample(v)
  wav_writer.finish()
You can play the output of this with your favorite media player, or you can visualize it if you have ffmpeg installed you can visualize it using this command
ffmpeg -y -nostdin -i ./example_232_hz.wav -lavfi showspectrumpic=s=1920x1080:mode=separate:orientation=horizontal:color=rainbow:scale=lin:start=20:stop=300 example_232_hz.png
That creates an image like this, showing us the waterfall plot of the audio file that we have created
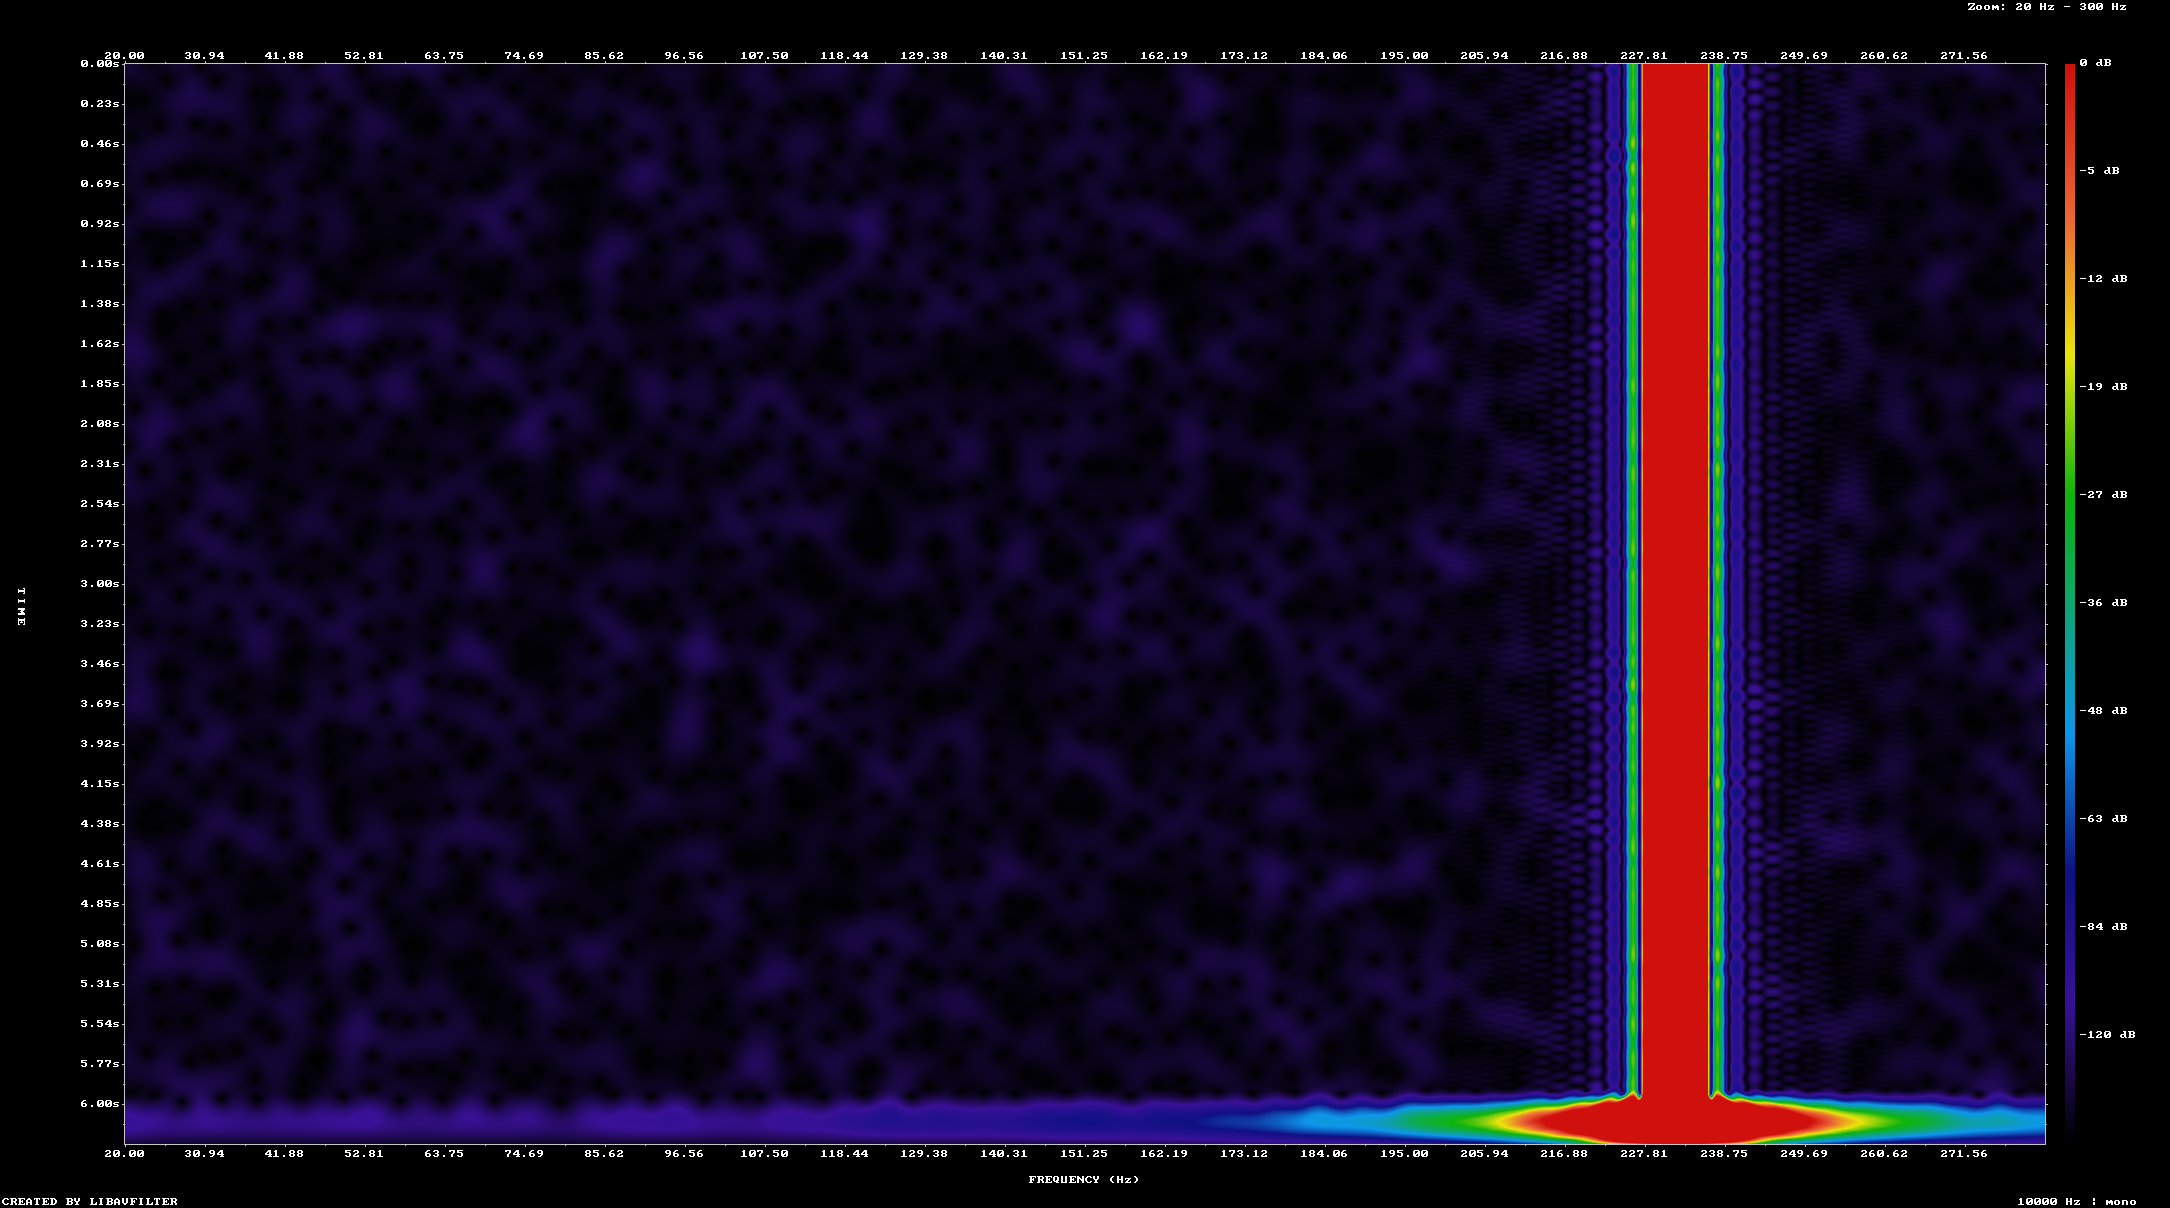
The bright line indicates where most of the sound energy is concentrated at, in our case 232 Hz.
Adding metadata
Now that I had a way to write out a WAV file, my main objective was complete. The secondary problem is since I am recording audio from a radio receiver it would be nice to know when the file was recorded and what frequency the radio was receiving at that time. It's common in audio files to include information like the artist & track name for music. So this was possible.
It turns out this is done by writing out a LIST chunk with an INFO sub-chunk after the RIFF chunk. Inside of the INFO sub-chunk you can write out any number of pieces of metadata. The overall format of this chunk is the same as the RIFF chunk. So the first twelve bytes can just be written out as b"LIST\xFF\xFF\xFF\xFFINFO" in Python. After that comes the metadata entries. Each piece of metadata has the following format
| Section | Byte offset | Type | Description |
|---|---|---|---|
| identifier | 0 | ASCII string, length 4 | the identifier for this metadata |
| value-length | 4 | uint32 | the length of the value that follows, including the null terminator |
| value | 8 | ASCII string, null terminated | the metadata value |
The biggest difference here is that since the chunk descriptor comes after all the samples, you need to record the file offset of the placeholder so it can be overwritten with the final length. This is done as part of closing the file after all the audio samples have been recorded. One important detail is that after each piece of metadata is writen the output needs to be padded to an even number of bytes. So the above example can be changed by just adding all this logic into the finish() method
  def finish(self, metadata = None):
    if metadata is not None:
      list_chunk_start = self.fout.tell()
      self.fout.write(b'LIST')
      list_chunk_size_offset = self.fout.tell()
      self.fout.write(b'\xFF\xFF\xFF\xFF')  # Place holder for chunk size
      self.fout.write(b'INFO')

      for identifier_enum, value in metadata:
        self.fout.write(identifier_enum.value)
        self.fout.write(LITTLE_ENDIAN_INT.pack(len(value) + 1))
        self.fout.write(value.encode())
        self.fout.write(b'\x00')
        self._pad_output_to_even()

      end_of_list = self.fout.tell()
      self._pad_output_to_even()
      self.fout.seek(list_chunk_start + 4)
      self.fout.write(LITTLE_ENDIAN_INT.pack(end_of_list - list_chunk_start - 8))

    v = self.fout.tell() - 8
    self.fout.seek(CHUNK_SIZE_OFFSET)
    self.fout.write(LITTLE_ENDIAN_INT.pack(v))

    self.fout.seek(DATA_SUB_CHUNK_SIZE_SIZE_OFFSET)
    v = 2 * self.sample_count
    self.fout.write(LITTLE_ENDIAN_INT.pack(v))
The identifiers are ASCII strings of length 4. I used a Python enumeration to capture all of the known ones.
class WavMetadataIdentifier(Enum):
  TRACK_TITLE = b'INAM'
  ALBUM_TITLE = b'IPRD'
  ARTIST = b'IART'
  CREATION_DATE = b'ICRD'
  TRACK_NUMBER = b'ITRK'
  COMMENT = b'ICMT'
  KEYWORDS = b'IKEY'
  CREATING_SOFTWARE = b'ISFT'
  ENGINEER = b'IENG'
  TECHNICIAN = b'ITCH'
  GENRE = b'IGNR'
  COPYRIGHT = b'ICOP'
  SUBJECT = b'ISBJ'
  CREATOR_NAME = b'ISRC'
Then I ran this code to produce an output that slowly sweeps
sample_rate = 7000
duration_seconds = 10.0
number_of_samples = math.ceil(duration_seconds * sample_rate)
sweep_start_hz = 200
sweep_end_hz = 650
delta_hz = sweep_end_hz - sweep_start_hz

rng = random.Random(1)
metadata = (
  (WavMetadataIdentifier.CREATING_SOFTWARE, 'write_wav_with_metadata.py'),
  (WavMetadataIdentifier.COMMENT, "sweep from %d Hz to %d Hz" % (sweep_start_hz, sweep_end_hz,)),
  (WavMetadataIdentifier.COPYRIGHT, "creative commons attribution")
)

with open('example_output_sweep.wav', 'wb') as fout:
  wav_writer = WaveWriter(fout, sample_rate)
  for i in range(number_of_samples):
    i_hz = delta_hz * (i/number_of_samples)
    v = math.sin(2 * math.pi * i * (sweep_start_hz + i_hz) / sample_rate) * 0.8
    v += rng.random() * 0.19
    v *= (2**15 - 1)
    v = int(v)
    wav_writer.write_sample(v)
  wav_writer.finish(metadata)
To see the actual metadata in this file you can use ffprobe.
$ ffprobe example_200hz_to_650hz_sweep.wav

Input #0, wav, from 'example_200hz_to_650hz_sweep.wav':
  Metadata:
    encoder         : write_wav_with_metadata.py
    comment         : sweep from 200 Hz to 650 Hz
    copyright       : creative commons attribution
  Duration: 00:00:10.00, bitrate: 112 kb/s
    Stream #0:0: Audio: pcm_s16le ([1][0][0][0] / 0x0001), 7000 Hz, 1 channels, s16, 112 kb/s
mediainfo bugs
Above, I used ffprobe to view the metadata in the output file. I should be able to use mediainfo to get the same information.
$ mediainfo site/joys-of-wav-file/example_200hz_to_650hz_sweep.wav
General
Complete name                            : example_200hz_to_650hz_sweep.wav
Format                                   : Wave
File size                                : 137 KiB
Duration                                 : 10 s 0 ms
Overall bit rate mode                    : Constant
Overall bit rate                         : 112 kb/s
IsTruncated                              : Yes

Audio
Format                                   : PCM
Format settings                          : Little / Signed
Codec ID                                 : 1
Duration                                 : 10 s 0 ms
Bit rate mode                            : Constant
Bit rate                                 : 112 kb/s
Channel(s)                               : 1 channel
Sampling rate                            : 7 000 Hz
Bit depth                                : 16 bits
Stream size                              : 137 KiB (100%)
But the metadata doesn't appear here, instead we see that IsTruncated is Yes according to mediainfo. So it seems that a problem is present with the file. After about an hour of trying to figure this out, I decided mediainfo must have a bug. All media players I tried played the file fine and could view the metadata. As far as I can tell, mediainfo expects the LIST chunk to come before the DATA chunk. This appears to be an informal aspect of the file format as it isn't called for explicitly anywhere.
Source code
All of this code is in a library available on github.
Sources
All of the information presented here is taken from the following sources